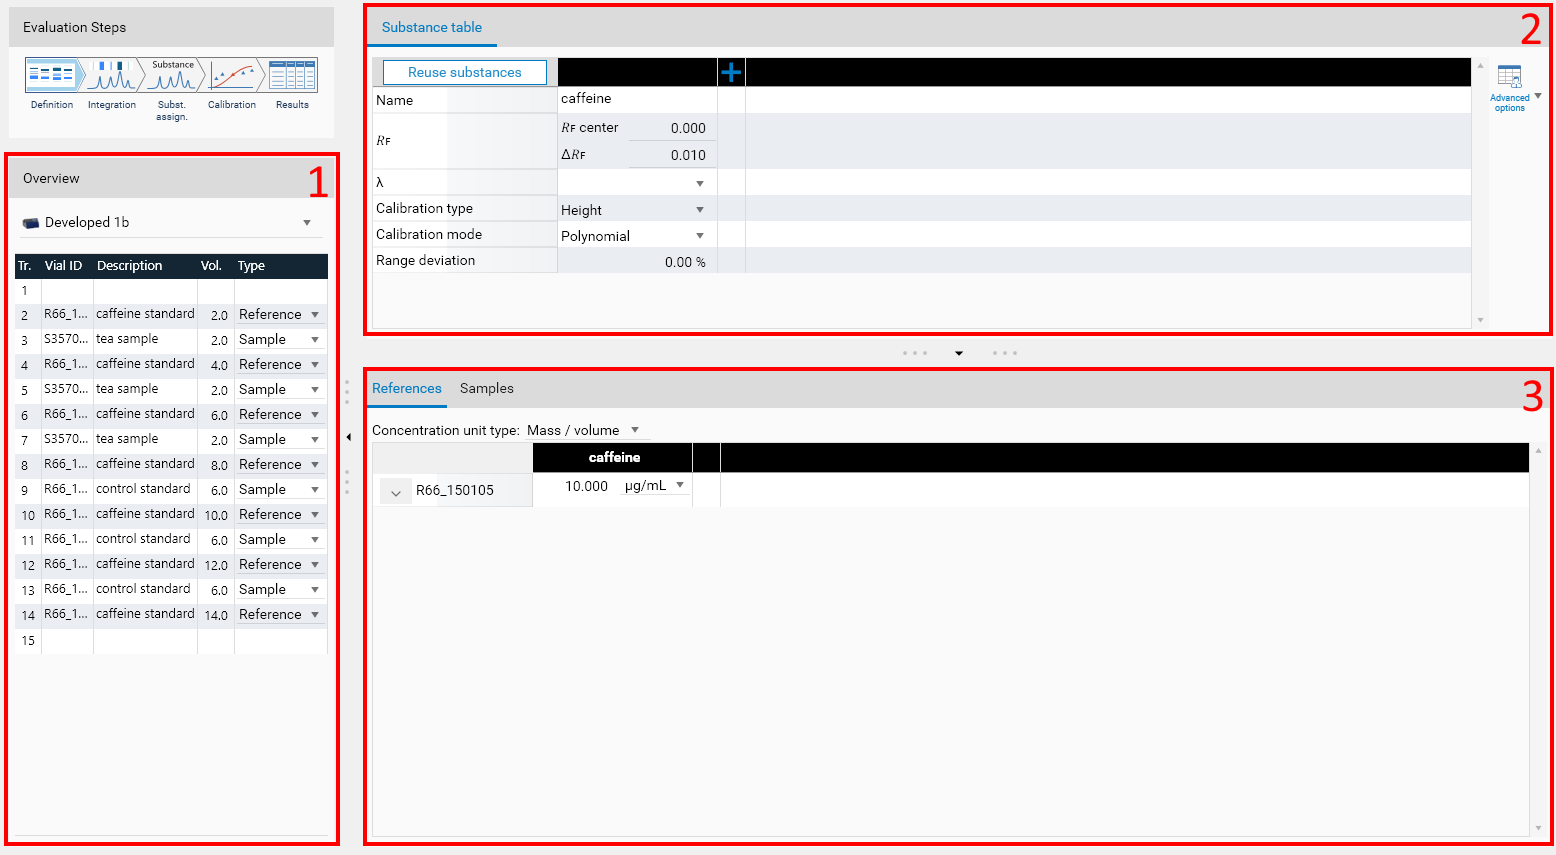
Definition

The Definition tab is used to:
1: Overview - Change the evaluation step and refine the tracks types for the evaluation
2: Substance Table - Configure the substances being analyzed during the evaluation
3: Configure the References concentration and purity and the Samples reference amounts for the evaluation
The Track assignment panel (left) recalls the contents of the Track Assignment (see Track Assignment for more details).
The Substance table grid and the References grid have fixed rows and are synchronized : a given column represents the same substance on each grid.
Important
The Track assignment, References and Samples areas are only available in analysis files.
Overview

This section allows to:
Define the step associated with the evaluation, i.e. the acquisition data source for this evaluation. This impacts the λ available in the Substance Table.
Note
The step can be configured in the Overview of the Integration too. Depending on the use case, it will make more sense to define the step in the Definition tab (when the user knows what to search for) or in the Integration tab (to look at the data first).
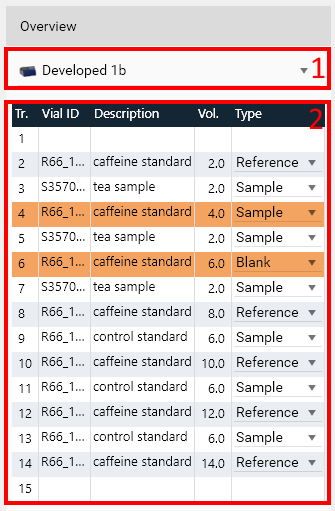
The Track Assignment already defines the sample tracks and the reference tracks for the current analysis, but it can happen that this configuration has to be modified for a given evaluation (for example to test different configurations in several evaluations). Use the combo box next to each track to configure individual vial applications. When you change the type of a vial application, the References and Samples sections of the current tab are modified accordingly, and the vial application is displayed with an orange background (e.g. tracks 4 and 6 in the previous screen capture) if the type is not the same as the one defined in the global Track Assignment.
Note
To ensure the consistency of the analysis, it is not possible to switch from/to the Background type in this table.
Substance Table
In this view, the column header of the grid contains the global actions related to the substance definition: an add button, a delete button, and an eventual warning button if the definition is invalid (here for example the substance is already defined):

The following parameters can be defined for a given substance:
Name: choose an existing substance or create a new one. If a substance is not known at this stage, you can add it later during the Substance Assignment step.
𝑅ꜰ: position and range of the expected peaks for this substance (between 0 and 1). During the Substance Assignment phase, the automatic assignment will search at this position by default but you will be able to set this position manually if needed. You can ignore this fields in the Definition phase if you don’t know where the peaks will appear at this time.
Note
Substances in Single assignment mode (default) use 𝑅ꜰ center and Δ𝑅ꜰ to define the 𝑅ꜰ range, while substances in Multiple or Range assignment modes use 𝑅ꜰ start and 𝑅ꜰ end. See Assignment mode.
λ: wavelength. The dropdown list contains all illuminations (for TLC Visualizer steps) and wavelengths (for Scanner steps) used in the current method/analysis. If the wavelength is set, the automatic assignment will try to assign peaks of this wavelength. Otherwise, the best peak is chosen.
Calibration type: indicates whether the height or the area of a peak is used to produce the reference and the sample points during the calibration phase. You can also set this value during the Calibration phase. Therefore, you can ignore it if you don’t know what to choose at this time.
Note
Since visionCATS 3.2, the default calibration type is area.
Calibration mode: indicates which regression algorithm is used in the Calibration phase. You can also set this value during the Calibration phase. Therefore, you can ignore it if you don’t know what to choose at this time.
Range deviation: during the calibration, the range is the interval between the minimum and the maximum applied quantity in reference applications for a given substance. Sample applications outside this range are excluded from the results by default (i.e.: when Range deviation =0%). Use the Range deviation to allow samples to be included outside the range. The value given is the percentage of the range allowed before the minimum and after the maximum. When using the Linear-1 regression with one reference regression point, visionCATS uses the interval between the origin and the reference regression point.
Note
It is possible to completely deactivate the Range deviation check by removing the contents of the field (select the contents and hit  or
or  )
)
Note
Use the Reuse substances to duplicate quickly the substances definition from another evaluation, SST or spectrum step (in the same analysis).
Important
Only duplicate (or use again) a substance in another evaluation when the needed concentrations are defined. Otherwise the concentration will not be editable anymore in both evaluations.
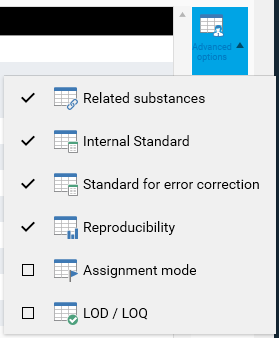
Advanced options are available when hitting the button on the right of the panel, allowing you to enable the and/or the functionalities:

Related Substances: define a main substance and some related substances for this evaluation.
Internal Standard: define a substance as internal standard for this evaluation.
Standard for error correction: define a substance as standard for error correction for this evaluation.
Reproducibility: evaluate the reproducibility for some substances in this evaluation.
Assignment mode: allow to change the way substances are assigned (assignment to multiple peaks or to a range).
LOD / LOQ: define Limit Of Detection and Limit Of Quantification quantities for some substances.
References
Define in this grid view the concentration (and purity) values for the interesting substance/reference vial couples, as well as the concentration unit type. The unit type is unique for the whole evaluation in order to prevent inconsistencies. You can choose between:
Mass / volume: this is the default and probably the most used mode. Results are expressed in mass unit.
Volume / volume: results are expressed in volume unit. Use this mode to express relative concentrations. As an example, ppm is equivalent to nL/mL.
Molarity: results are expressed in mole unit.
The corresponding substance/vials concentration in the grid, associated with the volume, gives the amount applied on which the quantification is based.
Each cell in this grid view can have a concentration/purity value. The concentration is always expressed with a maximum of 3 digits.
Note
visionCATS automatically adjusts the unit based on the concentration you enter. In the Calibration and the Results steps, quantities and concentrations are always shown in the most suitable unit.
When nothing is shown or when the concentration value is empty or 0.00, the link between the substance and the vial doesn’t exist or will be deleted during the next save operation.
At first, you will only see a , click on it to enter values.
If the concentration is 0.00 or the purity is invalid, a  will be displayed.
The link between a reference vial and a substance concentration/volume is global: if another evaluation has already defined this link, it will be automatically filled and in read only mode. The status is represented by .
If the concentration is already defined in another unit than the one requested in the evaluation, a warning will be displayed.
Note
Use the Substance/Vial editor to find and configure the substance/vial concentration defined in the current visionCATS installation.
Samples
Use this tab to define the sample reference amounts. Sample reference amounts allow to express the results of an evaluation in a more user-friendly manner than a concentration. They can be defined for each sample vial applied in the current evaluation.
The amounts (first column and Related to column) can be defined in Weight (gram-based) or Volume (Liter-based) depending on the Sample reference amount unit type (independent of the Concentration unit type defined in References).
The values of this tab results in factors being applied to the Results displayed at the sample vial tree level. See Sample reference amount display. To define a sample reference amount, fill at least the first (Weight or Volume) and the second (Diluted volume) columns. visionCATS will multiply the sample concentration result (expressed in unit/mL) with the Diluted volume. This allows to get the amount in the Weight or Volume defined.
Additionally, the Related to column can be filled to introduce another factor (Related to/Weight or Related to/Volume) (see following example).
Finally, the optional Comment field is a free text displayed as-is in the Results tab next to the sample reference amount, which can be used to describe where the reference amount comes from.
As an example, the following configuration:

Indicates that the sample vial S3570_150105 has been obtained by diluting 1.375 g (Weight) of a given product in 500 mL (the Diluted volume). The given product was a tablet (field Comment) of 1 g (Related to). With this configuration, the Results will show the quantity of substance in the original tablet in addition to the main result (concentration of substance in the sample vial).
The second sample vial R66_150105_01 has been obtained by diluting 10 mg (Weight) of a given product in 1 L (the Diluted volume).