Global Configuration

Analysis
Exposure normalization for images
When checked (default value), the Normalize exposure will automatically be activated for HDRI image. This means that even if the analysis was saved with normalization disabled (or Clarify enabled), visionCATS will enforce that the normalization is enabled. If you don’t want this behavior, you can uncheck this option.
Exposure normalization range on track
Select the default track for exposure normalization, depending on your needs.
TLC Visualizer 2/3 use the same reference point as a TLC Scanner 3/4
By default, you should put the plate in TLC Visualizer 2/3 application line first. If you are also looking inside the TLC Visualizer 2/3, it may be easier to disable this functionality, to be able to put the plate front first.
TLC Visualizer (any version) use a smaller ROI for auto exposure
By default, any version of the TLC Visualizer will use a smaller ROI (region of interest) than in previous visionCATS versions for searching the exposure area in auto exposure mode, to be compatible with CAMAG® HPTLC PRO Module DERIVATIZATION.
Note
In some rare not standard plate layout, the older ROI should be used. The smaller ROI will discard a margin of 12 mm left and right of the edges of the plate.
TLC Visualizer (any version) max. exposure time for HDRI images
This option, deactivated by default, has been introduced in visionCATS 4.0. By keeping it deactivated, Visualizer 2/3 takes HDR images like in previous versions:
Depending on Visualizer step parameters, the 1st image is taken either in Auto exposure (default, generally used) or Manual exposure mode. In Auto exposure mode, the determination of the 1st image, which includes several steps designed to calibrate the acquisition, can already take some time (up to 1 minute).
Then, starting from the actual exposure time of the 1st image, HDR images are taken successively with increasing exposure times until enough images are taken or until the hard limit of 60s exposure time is reached.
When the option is activated:
The determination process of the 1st image in Auto exposure mode is cut when the exposure time reaches the max. provided by the user.
Then, during successive captures of HDR images, the process is cut when the exposure time reaches the max. provided by the user.
By setting a max. exposure time value, the visualizer step execution time is therefore reduced at the cost of details provided by long exposure times, though the time saved is almost impossible to predict as it depends on the plate state.
The following table shows the visualizer step execution time observed in extreme situations (no plate and blank plate placed in Visualizer) with different values of max. exposure time. Note that Visualizer 3 generally takes more time (than Visualizer 2) in these specific situations because its higher sensitivity allows to perform more captures, leading to much better results.
Max. exposure time |
Visualizer 2 |
Visualizer 3 |
Visualizer 2 |
Visualizer 3 |
|---|---|---|---|---|
no plate |
no plate |
blank plate |
blank plate |
|
Deactivated (legacy) |
167 |
200 |
219 |
208 |
10s |
28 |
29 |
53 |
60 |
15s |
33 |
65 |
70 |
78 |
20s |
38 |
66 |
97 |
105 |
25s |
44 |
95 |
98 |
108 |
30s |
110 |
137 |
135 |
148 |
40s |
165 |
137 |
196 |
200 |
50s |
165 |
197 |
196 |
205 |
60s |
167 |
200 |
177 |
207 |
Consequently:
Setting a max. exposure time of X seconds does not mean that the whole acquisition process will take up to X seconds.
The acquisition process time and the max. exposure time are not linear.
The whole acquisition process time can still be greatly reduced by setting the max. exposure time parameter.
User management
This part allows to activate/deactivate the user management and to configure the associated options for the whole installation.
Note
Users and groups can be configured in the dedicated User management configuration windows. See User Management.
Note
If the Use user management box is not checked, the user visionCATS_user will be used automatically.
In a similar way to Microsoft Windows, you can set policies for a more secure system:
Minimum user id length
The minimum amount of characters of the user id
Force a password change on first use
Force securer password
The minimum number of rules that a password must follow.
Rules:
your password must have an lower case letter
your password must have an upper case letter
your password must have a number
your password must have a special character
With any level selected, Force securer password will enforce that the password is different than the user id.
Minimum password length
The minimum amount of characters that a password must have
Allow re-use password after
The user can reuse an old password after using others
Force change every
After this time the user must change their password
Lock account after
Max amount of failed logins, after that the account is locked automatically
User should re-enter password after switching to an “open as” item
If checked (default), the user must re-enter his password every time he click on a open as tab.
Important
Don’t forget to save the changes!
Notifications
The notification functionality sends an email to the user when a step execution is finished.
Note
Manual instrument step don’t send notification.
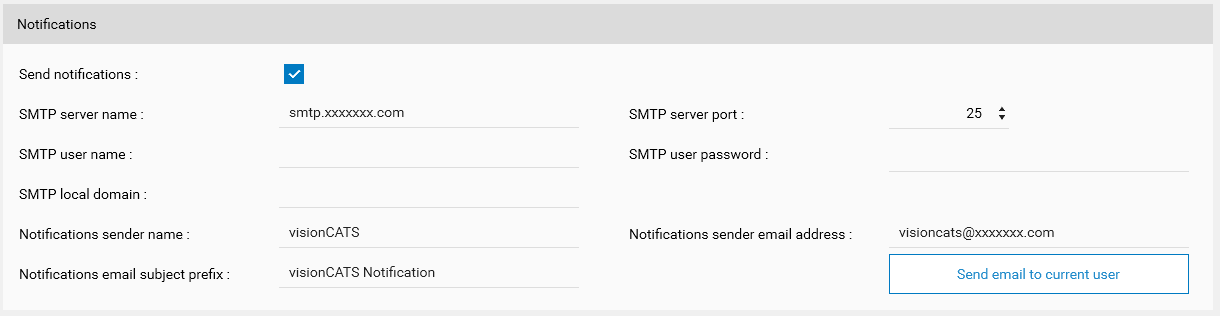
To configure this functionality:
Fill the SMTP server parameters (SMTP and Exchange allowed). Not all parameters are needed, depending on your email system. Please consult your IT administrator or your Email provider.
Use the notification’s sender name, email subject prefix and sender email address in conjunction to rules in your client email application in order to process the emails appropriately
In User table, fill the new Email address field:

Use the Send email to current user button to test the configuration.